Funnel
The Funnel report shows where you lose potential customers along the e-commerce purchase journey — Entrances → View Product → Add to Cart → Begin Checkout → Purchase — with the conversion and drop-off rate at each step. It is built automatically from your traffic and the e-commerce events you track, so there is nothing to configure.
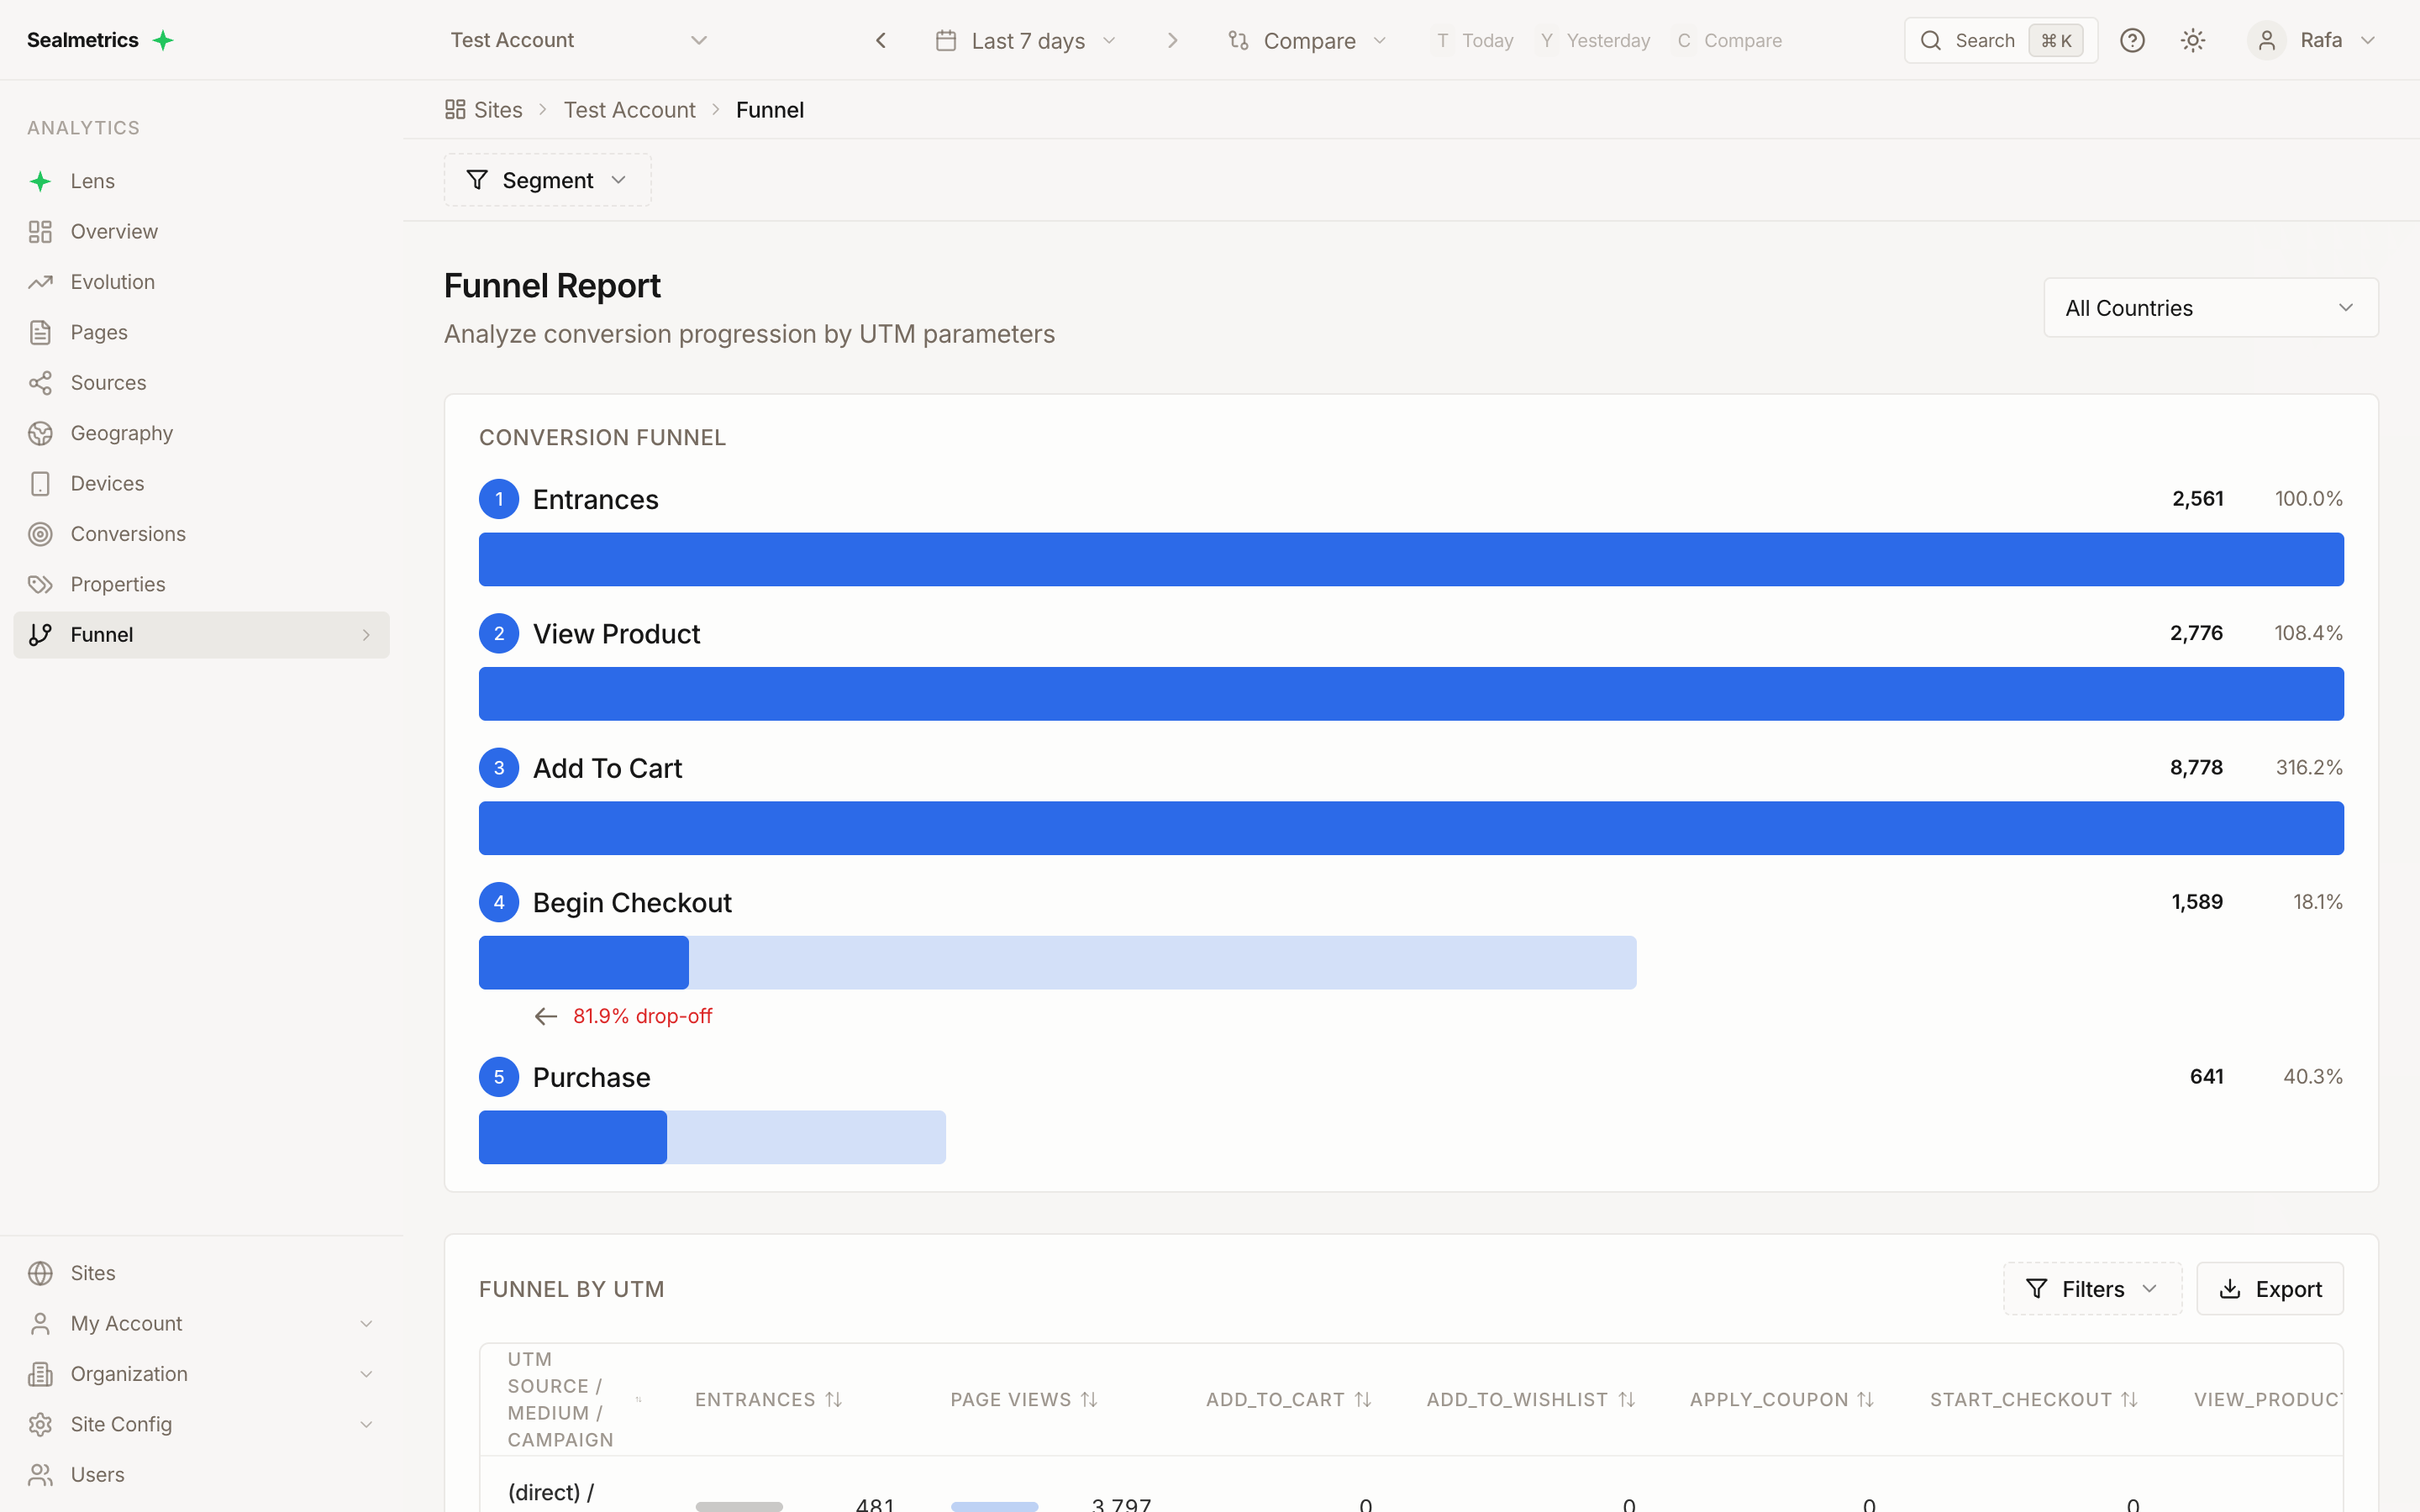
This is a built-in, fixed e-commerce funnel; the dashboard does not let you define your own step sequence. If you need a different sequence (e.g., a lead-form flow), you can track each step as a microconversion and inspect them in the Conversions report, or request an arbitrary ordered list of steps (page paths, microconversions, conversions) from the Stats API funnel endpoint.
Accessing the Report
- Select a site from the site selector
- Click Funnel in the sidebar (or press G then F)
URL pattern: /sites/{siteId}/funnel
How the funnel is built
The funnel is a fixed e-commerce sequence. Sealmetrics assembles it from the totals for the selected period:
| Step | Built from |
|---|---|
| Entrances | All entrances (sessions started) in the period — the funnel entry point |
| View Product | Number of view_item microconversions (legacy view_product also accepted; both are summed) |
| Add to Cart | Number of add_to_cart microconversions |
| Begin Checkout | Number of begin_checkout microconversions (legacy start_checkout also accepted; both are summed) |
| Purchase | Number of purchase conversions |
A step only appears if the corresponding event exists in your data for the selected period. If you don't track add_to_cart, for example, that step is omitted and the funnel goes straight from the previous step to the next one present. Event names must match exactly: a conversion named order or sale does not produce the Purchase step, and other e-commerce events you may send (such as view_cart or add_payment_info) appear only as columns in the Funnel by UTM table, not as funnel steps.
Each step is an independent total for the period, not the number of people who went through the previous steps in order. Sealmetrics does not track individual users, so it cannot follow one visitor from product page to purchase. In practice this means:
- Steps count events, not visitors. A session that views five products adds 5 to View Product, so View Product can exceed Entrances and show a rate above 100%.
- A purchase is counted even if that session never fired
begin_checkout(for example, if checkout tracking is missing on one payment path). - Read the funnel as the ratio between step volumes in a period, and compare those ratios across periods, countries, devices and campaigns.
The funnel relies on the standard e-commerce event names above. Send them from your store or tag setup to populate every step, and send the order amount with purchase so the table can show revenue. See the E-commerce Setup Guide for the event calls and platform-specific examples.
Funnel Visualization
The Conversion Funnel chart shows one horizontal bar per step, in order, from Entrances to Purchase.
| Element | Description |
|---|---|
| Step number and name | Position in the funnel and step label |
| Count | Total for that step in the period (entrances for step 1, event count for the others) |
| Rate | Conversion rate from the previous step (Entrances always shows 100%) |
| Bar length | Step count relative to Entrances |
| Bar fill | The darker fill inside each bar shows the conversion rate from the previous step (capped at a full bar) |
| Drop-off line | Under each intermediate step, a red "X% drop-off" line shows the share of the previous step's count that did not reach this step |
For each step after Entrances:
- Conversion rate = step count ÷ previous step count × 100
- Drop-off rate = (previous step count − step count) ÷ previous step count × 100
The last step (usually Purchase) shows its conversion rate but no drop-off line; its drop-off is 100% minus that rate. When a step's count is higher than the previous one (see above), no drop-off line is shown for it.
Country filter
Use the country selector in the top-right of the report to recalculate the funnel for a single country. It lists the top 20 countries for the selected period (and for any Segment filters you have applied); select All Countries to return to the global view.
The selected country applies to both the chart and the Funnel by UTM table, and it is added to (not a replacement for) any countries chosen in the global Segment panel: if the Segment is limited to Spain and you pick France in the selector, the funnel is empty.
Funnel by UTM table
Below the chart, the Funnel by UTM table breaks the same period down by traffic source so you can see which campaigns drive each part of the journey.
| Column | Description |
|---|---|
| UTM Source / Medium / Campaign | The traffic source for the row: source / medium on the first line, the campaign underneath (hidden when it is (not set)) |
| Entrances | Entrances attributed to that source, with a proportional bar |
| Page Views | Page views from that source, with a proportional bar |
| Microconversion columns | One column per microconversion type present in the period (e.g. view_item, add_to_cart, begin_checkout, plus any other microconversion you track) |
| Conversion columns | One column per conversion type present (e.g. purchase), showing the count and, when the conversions carry an amount, the revenue underneath |
How the table behaves:
- Rows are grouped by UTM source, medium, campaign and term, and the table holds the top 100 rows by entrances for the selected period and filters.
- Attribution is last click per session: each entrance, event and conversion is credited to the UTM values of the session in which it happened.
- Rows are paginated (10, 50, 100 or 500 per page) and the numeric columns are sortable.
- The Total row covers the whole filtered period — including sources outside the top 100 — for Entrances, Page Views and every event column.
Microconversion and conversion counts are matched to rows by source, medium and campaign. When one campaign has several UTM terms, each term appears as its own row and each of those rows repeats the campaign's full event and conversion counts (the term is not shown in the row label). Use the Total row, or filter by Term, rather than adding those rows up yourself.
Filtering
Four kinds of filters scope this report. They all combine with AND.
| Filter | Where | Applies to |
|---|---|---|
| Date range | Header date picker | Chart and table. Events must occur within the period. The Funnel report has no period-comparison view. |
| Segment (global filters) | Filter bar | Chart and table. All four global filters apply server-side: Countries, Device Type, Browser and Operating System. |
| Country selector | Top-right of the report | Chart and table (see Country filter). |
| Table filters | Filters button on the Funnel by UTM table | Chart and table (see below). |
Table filters (Funnel by UTM)
The filter builder on the Funnel by UTM table offers dimension fields only:
| Field | Operators |
|---|---|
| Source | equals, does not equal, contains, does not contain, starts with, ends with, is empty, is not empty |
| Medium | same as Source |
| Campaign | same as Source |
| Term | same as Source |
There are no metric fields (you cannot filter on Entrances, Page Views or event counts); sort the columns instead. Things to know:
- Table filters are resolved on the server, so they are applied before the top-100 cut — a low-traffic campaign is found even if it is outside the unfiltered top 100.
- They also recalculate the Conversion Funnel chart and the Total row, so you can see the funnel for a single source, medium or campaign (e.g. Medium equals
cpc). - Matching is case-sensitive (
Googledoes not matchgoogle). - All conditions are combined with AND. The builder shows AND/OR selectors, but OR has no effect on this report.
- A value containing a comma cannot be used and that condition is ignored.
Export
Click Export on the Funnel by UTM table to download its rows:
- Available as CSV and PDF
- Columns: Source, Medium, Campaign, Term, Entrances, Page Views, one column per microconversion type, and two columns per conversion type —
<type> (Count)and<type> (Revenue) - Contains the rows currently loaded (up to the top 100), after the country selector, Segment and table filters; the Total row is not exported
- Revenue is exported with two decimals and a
$prefix regardless of your site currency — read the values in the currency configured for your site
Analyzing the funnel
- Look for the step with the largest drop-off — that's where you're losing the most potential customers.
- Use the country selector to check whether the leak is concentrated in specific markets.
- Use the Funnel by UTM table to see whether certain campaigns convert through the journey better than others.
| Transition | Common issues to investigate |
|---|---|
| View Product → Add to Cart | Pricing, product page clarity, stock |
| Add to Cart → Begin Checkout | Shipping costs, unexpected fees, account-required friction |
| Begin Checkout → Purchase | Payment options, trust signals, checkout length |
E-commerce use cases
All of these cases need the standard e-commerce events: view_item, add_to_cart and begin_checkout as microconversions, and purchase as a conversion with the order amount. See the E-commerce Setup Guide. Because steps are aggregate counts, compare rates between steps rather than reading any single number as "the same shoppers".
Where do shoppers abandon the checkout?
- Set the date range to a recent, representative period (e.g. the last 30 days).
- In the Conversion Funnel chart, read the rate shown next to Purchase — that is purchases as a percentage of Begin Checkout events. Its drop-off is 100% minus that rate.
- Compare it with the rates of Add to Cart and Begin Checkout.
How to read it: the step with the lowest rate is your biggest leak. A low Begin Checkout → Purchase rate points at the checkout itself (payment methods, forced account creation, surprise costs, form errors); a low Add to Cart → Begin Checkout rate points at the cart (shipping cost reveal, promo-code field sending people away). A sudden fall in the Purchase rate with no site change is also worth checking against your tracking — for example, a payment method whose confirmation page does not fire purchase.
Which campaigns bring shoppers who actually buy?
- In the Funnel by UTM table, sort by the
purchasecolumn. - For the top rows, compare
purchase(and the revenue shown under it) with Entrances,add_to_cartandbegin_checkout. - To isolate paid traffic, open Filters and add Medium equals
cpc(use the exact medium value your campaigns send). The chart above recalculates for that traffic only.
How to read it: a campaign with many entrances but few add_to_cart events is sending the wrong audience or landing on the wrong page; one with healthy add_to_cart but few purchases loses people at checkout, which is usually a site problem rather than a targeting problem. Shift budget towards the campaigns whose purchases and revenue hold up relative to their entrances. For campaign-level revenue and conversion rate across channels, continue in the Sources report.
Is the checkout leak specific to one country?
- Note the Begin Checkout → Purchase rate with All Countries selected.
- Pick each of your main markets in the country selector and note the same rate.
How to read it: if one market converts clearly worse from checkout to purchase than the others, look at what differs there — local payment methods, shipping cost and delivery times, currency, language of the checkout, or tax shown late. If every country shows the same drop, the problem is in the checkout itself, not the market.
Does mobile checkout convert worse than desktop?
- Open Segment in the filter bar, select Device Type → Mobile and click Apply Segment. Note the rate of each step.
- Change the segment to Desktop and note the same rates.
- Optionally narrow further with Operating System or Browser (e.g. iOS + Safari) to spot a broken checkout on one platform.
How to read it: a lower mobile rate at Add to Cart → Begin Checkout or Begin Checkout → Purchase suggests friction that only shows on small screens — long forms, missing wallet payments, pop-ups covering the pay button. A step that collapses on one browser or OS only is often a technical bug rather than a UX issue. Remember that global filters persist across reports, so clear the segment when you are done.
Did my checkout change improve completion?
The Funnel report has no side-by-side comparison, so compare two periods manually:
- Set the date range to a period before the change (e.g. the 14 days before release) and note the Begin Checkout → Purchase rate — and the Add to Cart → Begin Checkout rate if you changed the cart.
- Set it to a period of the same length after the change and note the same rates.
- Keep the same country selector and Segment for both readings, and use the Export (CSV) of each period if you want the per-campaign detail side by side.
How to read it: compare rates, not raw counts, since traffic volume changes between periods. Use periods long enough to contain a meaningful number of purchases and avoid ones distorted by promotions or holidays; if your traffic mix changed (a new campaign launched), check the rate within the main mediums with the table filters before crediting the checkout change.
Related documentation
- E-commerce Setup Guide — The event calls that populate each funnel step
- Conversions Report — Every conversion and microconversion type, including ones that are not funnel steps
- Sources Report — Channel, source, medium and campaign performance
- Filters — Segment and table filters
- Metrics Definitions — Entrances, conversions, revenue and conversion rate